A Little Something About Me

My photo
I am a young female trying to make it though college and learn how to do what I love.

Friday, August 26, 2011

Wings!

Well this will be my last post for this cosplay and this will start being more about the things and projects I do in my classes that relates to being a game artist! I do hope people will still actually view this and stuff.


There isn't to much to say since I have been over the wings and putting on the feathers. Nothing has changed but this is pictures of me with them on. I normally weigh 126.4 pounds and with the wings on I weigh 132.4 pounds. Therefore my wings weigh 6 pounds and that is a suprise to me since I was thinking it was going to be in the line of 10-15 pounds. The harness fit very well and not much pain what so ever. I had to do two adjustments to even out the weigh. The right side felt heavier than the left so that is why adjustments were made....


Front


Slighly angled front

Back


I hope you have enjoyed this ! Good luck to those who are still working on theirs. Also I will post a tutorial on how the feathers were made. I don't know I will post it on someone else site or on my blog just yet. It won't be posted til a week to a day before Blizzcon.

Thursday, August 18, 2011

Clothes and Paint!

Well it is time for the second to last update everyone! This will just be about the outfit and my time trial run though the body paint. Both went very well.


To start off the outfit. I love how it came out, it is pretty nice. The headpiece is pinned to my straps and bra, and then the skirt just wraps around my leg and has some wire at the end to make it stick out and stuff but if I hit it with my other foot it wont hurt me at all.


The body paint took 3 hours to put on and the bald cap took a little over an hour but that is due to the fact I can trim parts and I had to cut the holes for the ears. I also learned that my hair once it is gelled back needs to be pretty dry so my head doesn't feel off when I put on the paint. Overall the body paint came out just as I wanted. So for Blizzcon if I want to make it out of my hotel room by 8:45am I will have to get up at like 4am. I still hope as we get closer I can get someone to help me with getting down from my hotel room and putting on the wings to the harness (i can technically do it by myself but it is hard and a chance i could bend my feathers (the long ones). I might invest into some blue gloves for holding things without my paint getting to messed up. It worked well when I tried it with black gloves. I will have touch up paint with me.

Also the way I am putting on my body paint is a combination of paint brushes and makeup sponges. One thing I did not do in my pictures was have any blue makeup (eye shadow and lipstick and that type of stuff)

Here are the pictures =) <3


The skirt before the end of the wrapped part
had wire in.
The headpiece. This is unpinned but it is how it will look expect the edges
won't come out as far as in the picture.


I got no hair =O
Starting the body paint, the bald cap wasn't placed on correctly
due to my hair was a bit to wet therefore it was having issues
but looking at the sides more of it did blend in nicely with my skin.
During Day 1 when I put it on I can do a nicer trim cut and also will have
makeup for the eyes and lips .


I am in full body paint. it turned out
better than I thought it was going
to, it takes about 3 hours to do
all of me.

This is just to prove that I am all the same color, in most of the
picture my legs seem to be a different color but it is only due to the
fact my mirror is part way blocked by my wings as
you can see in some of the pictures.

Monday, August 15, 2011

Big Wing Update!!!

Big update time !!! The wings are built and up! I may or may not do a few more things but so far things are pretty set in stone with the wings.


So here is a quick picture of one of the wings with just the second layer being applied. During this time is when I noticed a lot of my feathers were getting unfluffy due to me bending them and making adjustments on the placement.


This is when I got the last layer on after the set back that 7 sets that went along the highest points of the wings were off by about 4 inches which did surprise me a bit and I still don't know how they got that off, I was expecting some to be 1 inch maybe 2 inches but those feathers may end up  being used on the highest parts since it seems a bit bare but I do like it as it is right now. It keeps going back and forth in my head, I may just keep them in case something happens to one of the feathers and it needs to be partly replaced in some way.


This is the final time me bending the feathers to get the flow of the feathers, I didn't take a picture of the first time so sorry! Something you may of noticed in the picture is the bottom looks different. This is due to the fact I did re fluffy them up from me messing with the feathers getting them to the right angle and all of that stuff.


This is the top part of the wings ! I used a jewelry clear plastic thread type to get the boas on. This isn't 100% done yet since at the edges I just need to glue into PVC pipe (there is no caps so I just need a little glue and stick it in there.

This is just the back view of the wings.


So the last thing I need to do with the wings is do a trial run with them on my harness which should happen probably on Thurs or weds. What my goals are for this week (being the last week I can work on this before I am moving). Tomorrow is to try on my outfit then finish the harness by adding in the feathers all lengths and the top part. Then on Weds is when I do my full body paint time test. Now depending on how long it takes and when I start, all of that stuff I may do the test then. I don't think at this point in time I will have me in body paint with the wings with the outfit on as a picture. (If I do the wings test on weds I will be in my body paint, if thrus I won't be) I also still need to test out my bald cap which will be done on tues or weds. (most likely weds)


One last things, for those who are going and if you don't got a big costume on and stuff or not cosplaying at all, anyone willing to help me on the first day getting my wings on my harness then down in the elevator ? I hate to wait last minute to ask people so I am throwing it out there now. (my goal is to be down in front of the convention at about 9am)

Wednesday, August 10, 2011

Feathers and Wings

This post will be different than my other ones. Having issues with the pictures not wanting to line up correctly with the information about them. I may at a later point in time fix it up but for now this will have to do!

First the fun time of making them all fluffy like and more feather like. This process took a bit longer than I thought only due to the fact my first idea to stiffen them had failed me so I had to go to plan b and that needed more stuff for it.

Then came the organization of them all. I got them spilt into set 1 and 2. It does not really matter which set I use for which wing. So far how it seems to be going is set 1 will be left and then set 2 will be right. Also a small issue with my wings overall is they don't like hot weather. So Blizzcon you better not be hot when I go outside! The only issue mainly is what I use to stiffen them seems to disappears when in a room (making them in my room) that goes over 82 degrees ish.

Finally I have started to build the wings! I am still a bit nervous from how the long feather layer on the left wing came out due to a small issue with the stand itself makes it pretty much impossible for me to know if they are the right length or not til I do the other wing. If they end up looking the same then I will have to cut the ends of 4 feathers. Also got a some burns from me just not paying enough attention and getting distracted by many things. It sucked quite a bit but I will live and oddly enough since I wrapped them up it might help me tomorrow when doing the right wing.

The timeline of the wings is the following:
Long Layer Left Wing - 1 Day (today)
Long Layer Right Wing - 1 Day (tomorrow)
Medium Layer Both - 1 to 1 1/2 Days (12th to 13th it should take 1 day but it may go over if I am having issues with the burns I have or will get)
Small Layer Both- 1/2 to 1 Day.

Quick note about the pictures: Do the fact I am working in my room which is 10ft by 10ft and my wings are about 7 and half feet and have to go almost in the middle of my room I don't got a lot of room for pictures. Once I am fully done I will move the wings from my room to the living room for some pictures. Sorry. >.< (also my room is such a mess right now)

Pictures:


This shows the fluffy the medium length will go a few inches past were the board that is holding the harness


Yes that is my foot. This is me trying to get an overall picture in my room lol

Wednesday, August 3, 2011

Feathers and Harness

Hello everyone ! It is update time once again. I ended up deciding on to just add in the bit of the feathers in this post about the harness.

The first picture here is just how I was laying all the feathers out. I put them on a sheet since if I had any paint bubbles or messed up I could just wipe it on the sheet and you wouldn't really noctice the paint. The carpet is already pretty worn out in age itself and it is brown so white paint on it would be a lot harder to get out. XD

This picture is just a close up on the backs of the feathers to show what I was talking a bit more in my last post which was how they aren't going to be perfectly even and nicely out since some parts it has a bigger gap than others due to wire being twisted. I am very happy how they turned out. Once I rebrush them and stiffen then up and hang them on the skeleton then I will do any touch ups on parts that need it.


This is the harness just laying on the plexiglass with some tools as I was figuring out if the holes were able to fit in the screws.


This is a bit hard to see but those little small dots are the drill holes, this was taken after I had fully attrached on the harness.


These last two are just the front and back of the harness. On the back I will be putting on the foam backing. I hope to do that tonight after dinner. Not sure why they are greenish hue but yeah.


Tuesday, August 2, 2011

Feathers Work!

Hello everyone ! Finally got a big step done with my feathers. I decided to post this now without finishing the final steps for them since tomorrow I will be working outside on my harness and WEARING SUNSCREEN!

So pretty much the step was done mainly was just me putting all the cloth on the wires on the medium and short lengths. There isn't much to say since I already explained what I did when talking about the longest feathers. The main difference is the length and the fact that these did not need twisted wire.


Medium and Short


Long


Time to explain what is in the the last picture. The pvc pipe that you seen on the stand is not my harness but in fact just my messed up first try at it (it worked out in the end for me) and that is what will hold up my wings on the stand but eventually I will need to put on the last feathers on the harness (the long ones) but that shouldn't be to much of a problem since I can lay them out in the living room when I am working on the longest layer. (this is why I need to do most of my harness[cant do the straps until I get the buckles i had to order them online since it was a bit of an odd size I guessed.])

Monday, July 25, 2011

Final Dance UPDATED!!!!

Hello fellow Game Artist, Cosplayers and whoever else looks at this!

As I stated back when the Final Dance was posted that parts were going to be redone and after a while I finally got it done!

Pretty much what was redone was the lighting for the outside scenes and the prombot arms so they looked better and didn't look all funky. Then I redid two of the spin pieces only for the fact the backgrounds didn't work right. One was too dark and the other was way to distracting.


The music also got a bit off now since I added in 1 new picture but that was easily fixed with removing a few small parts. Lots of clipping of clips was done!


Let me know what you think of it!


It is now on youtube!  http://www.youtube.com/watch?v=e7BTYzfGlZ4

Thursday, July 21, 2011

Wires Wires Everywhere!

Update time everyone !!!! I figure I would start out by saying I will not be posting so many pictures when it comes to the next layer and the final one since it is basically the same thing as what I have posted and I figure that will get boring....If you think not let me know and I can post pictures still. I guess in a sense I don't know how many people are actually looking at my blog when I update it is all.

Also I am a bit behind on my cosplay work so no break after this layer. Also having a few issues now with the body paint, when I went up to SF then I did test out and the color I liked was just a number "587" and it was a nice shade of this blue. I found it on the site but it was the AU Kryolan site. First I was like no big deal about it since I could just order from cosplaysupplies and then that is when I found out there is a chance they do have my color but under a different name but then why the hell was it label wrong and then if it is just new or something than I will be putting in an order for it over the phone.

The other issue is just find the right boas, got a few places to check out. Some halloween store sites and joanns and I tried Michaels a while back appearly and they didn't have any of the boas I was looking for but I may of missed them....so if anyone knows if they got feather boas other than what is in the kid crafts section please let me know or any other places that are common or a site you have order boas from before.


So now to the update with the progress of the cosplay itself.


This is pretty much what it looked like. ALL THE WIRE GOT TWISTED!!!! This took a lot longer than I was expecting it to therefore I started to become behind. At first I was not expecting to have to twist the wires but I had to otherwise it would been a bit to weak to support the feathers since they were so long. I was worried mainly if I bumped into something or someone bumped into me that they would get bent out of shape and then drama drama drama would happen when I am trying to get them into shape.


Here is the a few of the wires before I straigthen them out so they werent twisting and tangling together. This made it a lot easier to get the cloth I am using on the. This also is what put me behind.


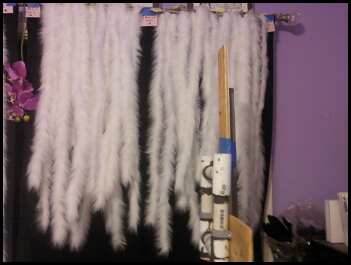
This is all the wires covered in the cloth. Also you can see my stand and what will become my harness eventually. Need to hit joanns to get the straps, a buckle, some type of foam, and more. Soon these will be what is in the next picture.


Not sure why it came out blurry but this is just the same one that was in one of my previous postings. I hope to have all of them looking like this one tomorrow as well as having them all bent to the right way.


Well it has been a long night and it is already almost 3am so I am off to bed. =)

Thursday, July 14, 2011

Feather Update!

Well, it is getting there. This will be the longest part (timewise) due to the lengths. The medium length feathers are HALF of the size of these. Then the smaller ones are half of the medium length size about. So once the long ones are done it will seem to go faster.


Here is when I first cut them out. I mainly did it so I didn't have to worry about the length when cutting these in half to get the ideal size. Sorry about the lighting but as you can see I had my window shade up so the purple walls make thing look all purple bluish.


Here is after when I cut them all in half. There is 42 strips of this fabric now hanging in my room. As you can see better in this picture is the yellow stick notes which have a number on them. That way when I am going though them I can see on my list which feather this will be and the length of them.


Here is the overall feather which is 49 inches long. I am lucky to have a floor that is a darkish color so you can see how fluffy it is . Also look there is my foot. =O  This is after a lot of struggling with the wire backing which I will talk about soon in this post.


This is just a close up of the bottom of the fake feather. It shows how part of it is a bit see though as I was talking about in previous post. This is also the reason why I can't say for sure if I will need to make more or not. Hopefully not, it takes me long enough do these as is.


This is the back view of the feather. As you can see there is a sem and I plan on painting that white using (not 100%) some type of puffy paint or just normal paint or nothing at all. Going to wait til I see all of them up on my wings to decide. Adding the paint would not be to much of an issue since this is the back and I can see all of them very easily.


Also with regards to the wire, I do have to do a twist (doesn't have to be tight twist) but it does now require me to order more wire tonight so I know that I got enough. Tonight I will also be ordering all the other supplies I need. Hopefully knock out all the wire tomorrow if not finish have it done by sat. I wish I had help but yeah. Well hopefully things go well. <3

Thursday, July 7, 2011

Update time! With pictures =O

Hello everyone! I finally have all the pictures that I was hoping to get. Reason for me not posting soon was that I had to change my harness skeleton and then a few other things needed to be fixed up a bit compared to what I first did. I think the heat did me in on the bad decisions I was making. Need to drink a lot of water even if I don't feel thirsty.


This first picture is mainly of the overall stand that I built so when I do put on my "feathers" that I can bend them to the right angle and once the wings are built and done then this will be fixed up (mainly attach a clamp then something else under it to make it I can still get it out) for my room and the hotel room so I don't take up a lot of space. Still looking for roommates for that in case there is anyone interested. Also why there is that shade at the base/ground is due to the fact I got an old old computer chair we had and put that on the bottom. The wheels don't worry 100% but it makes it a lot easier to move then a piece of flat wood.   


This is the wing skeleton for the main wings. It is right now just piping. There may be added structure in this but at this time I don't believe my feathers will need it. I will explain this when I get to the feathers section of this post.


Here is the first edit that I did on the wings. I decided to cut down the straight part of the wings since they seemed like they were going up to much. Also this will be the spot where it could be pulled up so I could go to the bathroom if I need to. It all depends on if I drink water.
This was the second change that I made. Before as you can see in the first picture that it was a lot bigger but then when I got to thinking of the padding and how it would fit on my back I came to the decision that it was to LONG. I had the width right but it went down to far on my back. A tip I recommend for those who will have something attached to their back, have someone else or (as what I did) have somewhere you could put it so you can see how it will fit. That way you can make sure it will work. The only reason before I thought it was fine since I was only comparing it to the front of my body and it fit fine but when it went to my back it had spots where it seemed to go almost to my butt and that would be painful (even with padding) to walk around with. One thing about this I haven't 100% decided on was the type of padding material I will use. I am going to talk with "my" seamstress who helps me with all the sewing for possible materials. If you have something to recommend
 PLEASE TELL ME!
     Here are my shoes! They are also know as FM shoes. Thank you Heather S. for giving me the link to them. They are pretty much what I needed. These will take me a while to get use to but I am starting to get it down but I have issues when I try to walk fast. I know with my wings I will be walking PRETTY SLOW but I do need to work since normally I walk fast, what some people call speed walking. Also these shoes have something else you can't see which should be fun to wear at the Blizzcon Afterparty which you can see in the next two pictures of the shoes. ^^

OMG SECRET POCKET!!!!!!

This is the back view of the shoes!

So this is the cloth I will be using to make the feathers. This is laid out on my bed so you can see it better. One thing I was doing all today mainly was trimming the edges since they always put on extra fabric since the edges aren't always as pretty since since as you can tell this is fluffy. Sometimes the edges get cut off wrong. Lucky for me I didn't have the cloth fluffy cut but a very short section at the TOP of it so it will be no problem what so ever. It is pretty soft and nice so it won't bug my skin when it is hitting it. 
Here is my test feather in the right color that I did a while back. The picture is blurry since I did put another type of cloth try right next to it. Once I make the feathers (technically start to make them) I will post a better picture. this one did have a bit of trimming but the only different that will happen is the bottom as you can see it flat so that need more of a curve. I hope to post a tutorial (there is only 1 tutorial on this type of thing that I could find) There are some fake feather tutorials but not with this type of material. One thing I haven't taken a picture of is the back but it has a little seam in the back and also there will be wire on it so then it can bend. The wire I decided on was 16 gauge wire. I thought of 12 gauge but it was getting difficult to bend. This will kept itself shape but has the ability to bend slightly. I may though have to double up on the wire for the longest feathers. I am going to a test with my feather to see if I should double the wire or not by twisting the wire. I will find out tomorrow. The other feathers for their length should not need the double wire.

Sunday, July 3, 2011

Back from San Fran!

I had a lovely time there and I picked my aquacolor but I am finding more online so I am comparing to the shade that I liked up there. I put on all the blues but you never know since a few seemed to be missing from the sample shades that they showed me. Either way the blue that I liked only had a number "587" aquacolor. Also sorry but I did forget to take a picture of it so when I order and it comes I will take a picture and post it then. Right now I am going off my memory (which is decent) and comparing it to the shade they show online to see if it is close or not and then going by the other blues I see online but didn't see the sample for. @-@ Should be fine though. From the few I remember since my skin is so light there is not much change in the colors. So if you are reading this and you have some blues and have pictures (or don't mind sending some pictures of the color on your skin) send me a message. =)

Also as I have posted on my facebook I am taking the rest of today off and then tomorrow (July 4th) to get settled in. Then I need to put in my orders for the last supplies I need. Then I need to meet up with a nice person I know to help me with the actually clothes part of it. I fail in sewing so yeah. xD

So I hope to be posting weekly or when something gets done. Like I will post when I get my first feathers done and then post either that day or tomorrow. Also I have not forgotten to post pictures of my skeleton or the thing/stand/ whatever you want to call it to make my wings easier to work with. Even though the harness pack isn't done I will explain why it looks the way it does and stuff. Trust me, you will get it more when I post the pictures.

So overall plan,
Have all the feathers made and hopefully almost or fully done being put on and my clothes will be done by the end of July. Then have the last touches and anything else done before I leave. My goal is to be done with my cosplay a week before I move. I am a bit nervous of leaving my wings behind and I can't check on my work (since it will be end of Aug til I come back done for the convention) and make sure the heat doesn't do any sort of damage to them ( going to do a test about that and I hope it works out right).

Well I hope everyone been having a blast and having a fun time working on their cosplay! I hope as well people are getting sleep and resting property and not exhausting themselves out over it all. =)

Have a Happy 4th! Also I hope you had a wonderful Canada Day!

P.S. I also need to work on my animations since those need a bit touch up since I will be turning those in to be reviewed by the school and the BETTER they are , I can hopefully jump some classes at the school. Have to edit some of my credits so they don't think I did the full on animations and then pass me on that class since I do lack on MAKING the animation.

Monday, June 27, 2011

Cosplay Planning!

Update time!

All the planning is done for the most part. There are some pieces that are a bit unknown but they do got a plan but I just need to find the right thing for it. It should not be to much of a problem though.

Before I leave to visit San Francisco I hope to have the basic skeleton done and ready since I have order all the supplies I need for my feathers. Some things I still need to order but I need the skeleton done is the top part of the wings I need a more exact number so I dont under/over order. The harness has a few parts that I want to have the harness skeleton built before I order those few items. There are a few things that I will be checking out when I am up in San Francisco which includes the body paint and bald cap.

So overall plan for tomorrow is to build the skeleton once my dad cuts all the pieces (which I will make sure he does or I will do it!) Then the next day I will order the remaining supples I need and then after finish packing and going to bed REALLY EARLY!!!! My flight appearly leaves at like 7am. I am hoping then once I get back that coming weekend I can head out and find the LAST items that I will need. From there on everything will hopefully go smoothly.

Also I got my shoes for my cosplay. I been doing some type of walking around the house in them everyday. I hope that way I can be ready for the stage. HOPEFULLY it isnt that horrible slanted one. It had little to no support and with my flat shoes that I had I slid down them a bit which freaked me out. Now with these shoes I hope the stage is a bit more fitting, when they release the sign ups for the contest I plan to enter then email about the stage.  One issue I am facing right now though is how to get up and down from my hotel room. I hope to find some nice helpful people who are willing to help me with that. =)

Thursday, June 23, 2011

Blizzcon 2011 Cosplay

The time is here for me to announce my cosplay. I want to thank to all of those who helped me when I was in the planning stages.
Thank Megan Duck, Heather Scofield , Shivani Mann!


Well, my Blizzcon 2011 cosplay is the Spirit Healer.

I decide to do the fan art done by cocoasweety for how the wings seem to be very fluffy and there for nice to feel against my back and legs. I have issues with store brought (huge) feather wings since after time my legs feel like something is on it. Making the secret pockets to hold my cellphone and some money should be fun. I hope to be in full building mode in July when I am back from San Francisco! (Where I will check out the body paint!!!!)


Tuesday, June 14, 2011

The Final Dance

This was my final for the class. I was hoping to do more objects and environment playing but there was a small issue that my render times were going into the 5 hours + per like 100 frames and there was 1600 frames about. So do the the lack of time and render times I ended up cutting a lot of my environment to make due which did hurt a bit. This one unlike my others does have music and I think I did a really good job, I know I did better than some of the two time students who had theirs done around 3/4th of the class and just slacked off which annoyed me a bit since they could of done so much more. Not my problem though so yeah.


There is one thing I do wish to add, for the future I need to master the lighting system. I was lacking a lot with the final area. The outside I had to cut the shadow quality down otherwise it was over 7 hours. Then for the inside I was running low on time so I got rid of the roof which you can see a bit. I didn't have the time to figure out the 100% lighting for the inside. So I do know this may seem good but I need a lot more work for this to be really good. As a first time student taking the class it is okay for now.

Second Animation!

This one was another file he gave us but we were allowed to add or subtract or swap things around. I did a few things. We also learned how to fix bugs that would come up more in this animation than the last one. It was kind of funny with how it was turning out at times with no fixes on it. Also some people like me made a scene (even though for my last one I did that to). So I did go with a similar theme as my last video. Just like the last one this one also has no type of music in it.

I hope you enjoy it!

Beginning the work with Animations.

Thoughout the class going from the point of where the models ended we were told to make a robot that we felt represented us. My first robot named the Prombot ended up having issues a week before we had to have it done with the animation he gave us to use. Then was born Muffy. So in my videos the robot you see is not my first but my second in the final video my first robot with all her fixes for the most part is in it. There was always some issues but for a first year student I believe I was doing the best that I could in the time limit I had.

This is the first video. He gave us an animation file that he gave us. It is from Michael Jackson (hint why it is the MJ dance). There is no music in this but I hope in the future maybe I could add one of his songs to it.

Two room layouts

This was due a few weeks before the middle of the semester.


This is my first room. I used the most pieces in here. There are a few extra pieces but they were mainly ones that were iin 3ds max already. This also showed the table in the best of light where it was seethough but had a hue of red/pink and had a nice shine on it. The room was going to have a window but I ran out of time to figure out adding a window.


This is my second room. This room I had fun making since it was going to be a dark room and at first I was going to add a lite light over the chair that is coming at you as if it is inviting you to come and play. Also a decision I was thinking about doing was the chessboard and pieces would be already in progress but then with the story I had going with it a new game made more sense.

This is the project I turned in. Also I learned about that you should always try and do a test print at a smaller version ( this was 11x17) so then you know if your colors will be coming out correctly. I learned that lesson the hard way. The dark purples and gray floor ended up going to almost black and unless the lighting was correct then it looked like a dark mess which did disappointed me a lot. Also one piece that is missing in this was my staff I was doing since the texture was not coming out correct and later I was taught on how to do the unwrapping which made it looks a lot better than it was before with cheesy texturing.