Update time!
All the planning is done for the most part. There are some pieces that are a bit unknown but they do got a plan but I just need to find the right thing for it. It should not be to much of a problem though.
Before I leave to visit San Francisco I hope to have the basic skeleton done and ready since I have order all the supplies I need for my feathers. Some things I still need to order but I need the skeleton done is the top part of the wings I need a more exact number so I dont under/over order. The harness has a few parts that I want to have the harness skeleton built before I order those few items. There are a few things that I will be checking out when I am up in San Francisco which includes the body paint and bald cap.
So overall plan for tomorrow is to build the skeleton once my dad cuts all the pieces (which I will make sure he does or I will do it!) Then the next day I will order the remaining supples I need and then after finish packing and going to bed REALLY EARLY!!!! My flight appearly leaves at like 7am. I am hoping then once I get back that coming weekend I can head out and find the LAST items that I will need. From there on everything will hopefully go smoothly.
Also I got my shoes for my cosplay. I been doing some type of walking around the house in them everyday. I hope that way I can be ready for the stage. HOPEFULLY it isnt that horrible slanted one. It had little to no support and with my flat shoes that I had I slid down them a bit which freaked me out. Now with these shoes I hope the stage is a bit more fitting, when they release the sign ups for the contest I plan to enter then email about the stage. One issue I am facing right now though is how to get up and down from my hotel room. I hope to find some nice helpful people who are willing to help me with that. =)
A Little Something About Me

- Alicia
- I am a young female trying to make it though college and learn how to do what I love.
Monday, June 27, 2011
Thursday, June 23, 2011
Blizzcon 2011 Cosplay
The time is here for me to announce my cosplay. I want to thank to all of those who helped me when I was in the planning stages.
Thank Megan Duck, Heather Scofield , Shivani Mann!
Well, my Blizzcon 2011 cosplay is the Spirit Healer.
I decide to do the fan art done by cocoasweety for how the wings seem to be very fluffy and there for nice to feel against my back and legs. I have issues with store brought (huge) feather wings since after time my legs feel like something is on it. Making the secret pockets to hold my cellphone and some money should be fun. I hope to be in full building mode in July when I am back from San Francisco! (Where I will check out the body paint!!!!)

Tuesday, June 14, 2011
The Final Dance
This was my final for the class. I was hoping to do more objects and environment playing but there was a small issue that my render times were going into the 5 hours + per like 100 frames and there was 1600 frames about. So do the the lack of time and render times I ended up cutting a lot of my environment to make due which did hurt a bit. This one unlike my others does have music and I think I did a really good job, I know I did better than some of the two time students who had theirs done around 3/4th of the class and just slacked off which annoyed me a bit since they could of done so much more. Not my problem though so yeah.
There is one thing I do wish to add, for the future I need to master the lighting system. I was lacking a lot with the final area. The outside I had to cut the shadow quality down otherwise it was over 7 hours. Then for the inside I was running low on time so I got rid of the roof which you can see a bit. I didn't have the time to figure out the 100% lighting for the inside. So I do know this may seem good but I need a lot more work for this to be really good. As a first time student taking the class it is okay for now.
Second Animation!
This one was another file he gave us but we were allowed to add or subtract or swap things around. I did a few things. We also learned how to fix bugs that would come up more in this animation than the last one. It was kind of funny with how it was turning out at times with no fixes on it. Also some people like me made a scene (even though for my last one I did that to). So I did go with a similar theme as my last video. Just like the last one this one also has no type of music in it.
I hope you enjoy it!
I hope you enjoy it!
Beginning the work with Animations.
Thoughout the class going from the point of where the models ended we were told to make a robot that we felt represented us. My first robot named the Prombot ended up having issues a week before we had to have it done with the animation he gave us to use. Then was born Muffy. So in my videos the robot you see is not my first but my second in the final video my first robot with all her fixes for the most part is in it. There was always some issues but for a first year student I believe I was doing the best that I could in the time limit I had.
This is the first video. He gave us an animation file that he gave us. It is from Michael Jackson (hint why it is the MJ dance). There is no music in this but I hope in the future maybe I could add one of his songs to it.
This is the first video. He gave us an animation file that he gave us. It is from Michael Jackson (hint why it is the MJ dance). There is no music in this but I hope in the future maybe I could add one of his songs to it.
Two room layouts
This was due a few weeks before the middle of the semester.

This is my first room. I used the most pieces in here. There are a few extra pieces but they were mainly ones that were iin 3ds max already. This also showed the table in the best of light where it was seethough but had a hue of red/pink and had a nice shine on it. The room was going to have a window but I ran out of time to figure out adding a window.

This is my second room. This room I had fun making since it was going to be a dark room and at first I was going to add a lite light over the chair that is coming at you as if it is inviting you to come and play. Also a decision I was thinking about doing was the chessboard and pieces would be already in progress but then with the story I had going with it a new game made more sense.
This is the project I turned in. Also I learned about that you should always try and do a test print at a smaller version ( this was 11x17) so then you know if your colors will be coming out correctly. I learned that lesson the hard way. The dark purples and gray floor ended up going to almost black and unless the lighting was correct then it looked like a dark mess which did disappointed me a lot. Also one piece that is missing in this was my staff I was doing since the texture was not coming out correct and later I was taught on how to do the unwrapping which made it looks a lot better than it was before with cheesy texturing.

Render of Models
Welcome everyone! This was done a few weeks before the half way point in the class. I am happy for how they turned out before I learned more about the program and what else it could do.

These are two of the 4 pictures that I made. It was a simple frame work and then a string so it was hanging from the wall in one of the rooms that I made.

This is a bowl of cereal. The cereal I was going with was frosted Cheerios in a nice bowl of milk. I have some issue with the lighting since sometimes it made the milk turn pink-ish from the white. For the final room I did redo it and it worked out fine.

This is one of the chairs I did. This was one of the first thing I modeled in the program. It took a while to texture this one since I was still learning all the tips and tricks so when it was all one object it could have different colors.

This was my second chair that I did. I went for a more dangerous type of look with the points and the sharp curves then with the seat I tried to make it so it did not look so flat like my other one.

This was my chessboard. We were required to make and it was our first time using splines and then some of the pieces (mainly the Horse) extruded and then we lathe them. This was also the first time I textured something. I had a blast figuring out the chessboard. We were only suppose to do the pieces.
This was my attempt at making a deck of cards. I made the top texture pretty easy but I had trouble with trying to get the lines to be correct.
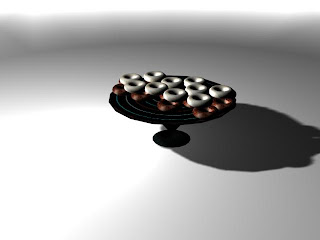
Say hello to DONUTS!!!! Even though this isn't that much of me modeling I did make the plate and that was fun to do. I later as you will see in another post did a re texture on all of it but the chocolate donuts.

This is my first try at making a glass table. Someone in my class was making a dome to place a flower of some type in a glass dome. I tried to apply the same effects but the computer refused to render out correctly for an unknown reason. I ended up doing a see though with a hint of red/pink.

This is my milk bottle. This was required to do in the class for the fact it taught us about how to get the circle to square type of shape. This could be used on any shape or just a scaled up or down version of the same one. Most of the class each had a different color top to it. I went with a little purple (lilac).

This is the second set of pictures. I do apologize that this isn't right next to the other one. I still have a few issues with moving pictures around when I have so many of them. But this were for my other room which did not make the cut to go into my final room.

This I made week 3 with other classmates. Since we all were making donuts like crazy a few of us tried to go into making a plate. Most of ours ended up like mine. It was fun to do it but I know it still looks a bit flat.

Yo-yos set 1. The one on the left is the one I made first while the other is the third.

Yo-yos set 2. The one of the left is the last one I made and the other is the second. The reason for the last one was due to that fact was it was skinnier. I was going off the pictures I found on the Internet.

This was my first model. This went with my first chair which was seen earlier. I was having fun learning the different modifiers effects. This one is mainly the bend and then the poly.

Hello teapots! This one of the left is the basic you have on 3ds max and the other is one I made. I used both for my image for the fact I was testing out different textures.

Hello teacups! This one I was having a lot of fun messing with the textures. Though I believe I put in to much reflections but it gives it a neat unique look.

This was another table I made for one of the rooms. Even though you can't see it to well there is a texture on the table top (spades, hearts, diamonds, clovers) in purple.

This is a spoon. Even though it looks a bit off I figure for the amount of time that I had. Later I did fix it up and did want I needed to to make it look more like a realistic spoon.

This was the cheesy texturing on my staff. I did forget to retake a render picture when I redid the texture but it is in my final room and the new texture is shown but it doesn't have a shadow in it though.

These are two of the 4 pictures that I made. It was a simple frame work and then a string so it was hanging from the wall in one of the rooms that I made.

This is a bowl of cereal. The cereal I was going with was frosted Cheerios in a nice bowl of milk. I have some issue with the lighting since sometimes it made the milk turn pink-ish from the white. For the final room I did redo it and it worked out fine.

This is one of the chairs I did. This was one of the first thing I modeled in the program. It took a while to texture this one since I was still learning all the tips and tricks so when it was all one object it could have different colors.

This was my second chair that I did. I went for a more dangerous type of look with the points and the sharp curves then with the seat I tried to make it so it did not look so flat like my other one.

This was my chessboard. We were required to make and it was our first time using splines and then some of the pieces (mainly the Horse) extruded and then we lathe them. This was also the first time I textured something.
 I had a blast figuring out the chessboard. We were only suppose to do the pieces.
 This was my attempt at making a deck of cards. I made the top texture pretty easy but I had trouble with trying to get the lines to be correct.

Say hello to DONUTS!!!! Even though this isn't that much of me modeling I did make the plate and that was fun to do. I later as you will see in another post did a re texture on all of it but the chocolate donuts.

This is my first try at making a glass table. Someone in my class was making a dome to place a flower of some type in a glass dome. I tried to apply the same effects but the computer refused to render out correctly for an unknown reason. I ended up doing a see though with a hint of red/pink.

This is my milk bottle. This was required to do in the class for the fact it taught us about how to get the circle to square type of shape. This could be used on any shape or just a scaled up or down version of the same one. Most of the class each had a different color top to it. I went with a little purple (lilac).

This is the second set of pictures. I do apologize that this isn't right next to the other one. I still have a few issues with moving pictures around when I have so many of them. But this were for my other room which did not make the cut to go into my final room.

This I made week 3 with other classmates. Since we all were making donuts like crazy a few of us tried to go into making a plate. Most of ours ended up like mine. It was fun to do it but I know it still looks a bit flat.

Yo-yos set 1. The one on the left is the one I made first while the other is the third.

Yo-yos set 2. The one of the left is the last one I made and the other is the second. The reason for the last one was due to that fact was it was skinnier. I was going off the pictures I found on the Internet.

This was my first model. This went with my first chair which was seen earlier. I was having fun learning the different modifiers effects. This one is mainly the bend and then the poly.

Hello teapots! This one of the left is the basic you have on 3ds max and the other is one I made. I used both for my image for the fact I was testing out different textures.

Hello teacups! This one I was having a lot of fun messing with the textures. Though I believe I put in to much reflections but it gives it a neat unique look.

This was another table I made for one of the rooms. Even though you can't see it to well there is a texture on the table top (spades, hearts, diamonds, clovers) in purple.

This is a spoon. Even though it looks a bit off I figure for the amount of time that I had. Later I did fix it up and did want I needed to to make it look more like a realistic spoon.

This was the cheesy texturing on my staff. I did forget to retake a render picture when I redid the texture but it is in my final room and the new texture is shown but it doesn't have a shadow in it though.
Subscribe to:
Posts (Atom)